“Recently, I purchased a new system and started using Outlook email client on that system. In my laptop, I am using Exchange Server. Now, I want to export Exchange mailbox to PST file format. So, please suggest me a reliable way using which I can complete my task without any data loss issue.”
Are you also facing the same issue? Do you want to move Exchange Database to PST? Do not worry, you are landed on the correct page. As in this blog, we are going to introduce simple yet trustworthy methods using which a user can easily Export Exchange 2010 mailbox to PST format with and without PowerShell.

Need to Export Exchange Mailbox to PST File Format
As it is known that Exchange Server is a mail server and calendaring server which is developed by Microsoft. It runs on the Windows Server operating system. The entire data is stored in OST file format when Outlook is connected to Exchange Server. Sometimes, users need their Exchange Server data into PST file format. Therefore, to access the Exchange Mailbox in Microsoft Outlook, the users first have to export the mailbox into the supported file format.
Different Methods to Move Exchange Mailbox to PST
There are various ways using which a user can easily transfer Exchange data including emails, contacts, tasks, journals etc. to PST file format.
Method 1: Automated Approach – Export Exchange Tool
Moving Exchange Mailbox to PST with PowerShell is associated with lots of shortcomings. Additionally, the manual solutions are completely dependent on the version of MS Exchange. The process is very lengthy and time-consuming. Moreover, technical expertise is required to perform the steps in an accurate way. You can eliminate all the limitations by using an automated solution that is SysTools Export Exchange Tool. This utility migrates multiple Exchange Server mailboxes into MS Outlook PST file format in a hassle free way. Some of the advanced features of the application are explained below:

- The software maintains the original folder structure while the export process.
- A user can move all the items such as email, contacts, calendars etc. in a PST file format.
- The utility also performs various functions like auto-detection, scanning and loading the Active Directory configuration.
- Provide option to Search Exchange Mailbox within Sub-domain.
Method 2: To Move Individual Mailbox from Exchange to PST using PowerShell Commands
- First of all, click on the Start Menu and open PowerShell window on your system.
- Now, you have to create a shared folder over the network. Then, you have to archive PST file that includes the transferred mailboxes of Exchange in the shared folder
- With the help of the commands given below, you have to insert all the library files, which are required for the export process:
![]()
- After that, you have to run the MailboxExportRequest PowerShell command which consists of two important attributes:
- File Path: Shows the sharing path where the PST file is to be exported.
- Mailbox: It represents two things either the name of the mailbox or the SMTP address of the mailbox which is to be transferred.
- Now, if you have gathered the value of the above attributes, then move to next command:
![]()
Once you have executed the commands given above correctly then your Exchange Database will be migrated to Outlook PST file format. To check that, you can go to the location where you have stored the transferred data.
Using the above commands, you will be able to move Exchange mailbox to PST format (Individual). Now, some users are there who want to migrate selected data. In this case, you have to apply some other parameters also in the commands given below:
- Include/Exclude Folder: With the help of this parameter, the user can select the Exchange folders which he/she want to export to PST file format.
![]()
In the above PowerShell command, the user is exporting the Exchange Inbox and SentItems folder. If you want to export any other folder just change the folder name.
- IsArchive: If the main purpose of the user is to export the archive Exchange Database then he/she have to follow the command given below.
![]()
- Content Filtering: If the user wants to convert Exchange 2016 / 2013 / 2010 / 2007 mailbox to Outlook PST of the selected time duration then this parameter is important.
For Example: If a user wants to export all the items before a particular date such as 05/12/2017. Then with this option, he can easily move all the Exchange items before 05/12/2017 to PST.
![]()
- Create a Unique ‘Export Request’ Name: At the time of tracking the user can use this PowerShell command to create a unique name for the export request.
![]()
Method 3: Using ExMerge Utility to Migrate Exchange Database to PST -2003
ExMerge is the native tool, which is not available in the latest versions of Microsoft Exchange. Following steps are given below to export Exchange mailboxes to PST via ExMerge:
- First, you have to download and install the ExMerge tool on your system and launch it.
- Now, you have double-click on the EXE file and then login into the Exchange setup account.
- After that, the Exchange Mailbox Merge pane will be displayed on your screen.
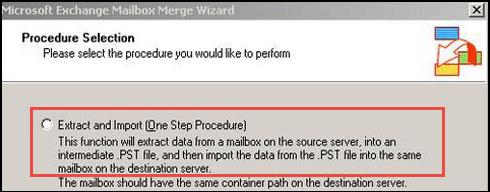
- Click on the Extract and Import option (One-Step Procedure).

- Now, Data Selection Criteria windows will display, click on the Import Procedure tab and then activate the option Archive data to target store and click on Apply button.
- The existing mailboxes in the MS Exchange Server will be displayed. Select the required mailbox and click on the Next button.
- Define the path of the final PST file by clicking on the Change Folder button.
- Click on the Next button to begin the export process. You can also view the live status of the exporting procedure.
- After the completion of the export process click on the Finish button. To view the resultant PST file go to the location where you have saved it.
Note: You can apply the above process only if you are using Exchange 2003 or the below version.
Method 4: Migrate Multiple Exchange Mailbox to PST
When you want to move single EDB email to PST then you can apply the above methods.
But in case, if you want to export Exchange Databases in bulk then you have to follow the method given below. In Exchange 2010 version, the new feature was embedded that was Import/Export command instead of ‘Export Mailbox’ feature. To move Exchange email to Outlook you have to use new Import/Export command. For this, you have to follow the basic prerequisites which are necessary.
- It is compulsory for the user account to be a member of the ‘Organization management group’.
- It is necessary to have a ‘Mailbox Import Export’ role, which is assigned to a user or group.
- Specify the path UNC over the shared network with reading and write permission to the ‘Exchange Trusted Subsystem’ group.
- Once you have granted all the permission, restart the Microsoft Exchange Management Shell. This will update all the changes in the server.
Now, follow the steps to export multiple mailboxes to Outlook PST:
- With each mailbox, apply a ‘for-each’ loop as shown below:
[PS] $Export=.\mailboxes.txt (Saving to a variable)
[PS] foreach ($i in ($Export)) {New-MailboxExportRequest -Mailbox $i -Filepath "\\Servername\Sharepath\$($i).pst" }
- This command will help you in creating the backup of all the mailboxes to an individual share.
Still not able to export Exchange mailbox to PST? Facing some difficulty? Do not panic, switch to method 4 which is the most simple and reliable method.
Final Words
Most of the users are not able to find a reliable and simple way using which they can move Exchange Database to PST. Therefore, in the above section, we have discussed some methods using which the user can easily export Exchange mailbox to PST. But, it is advised to go for an automated solution that is SysTools Export Exchange Tool. With this software, the user will be able to migrate multiple Exchange Server Mailboxes into MS Outlook PST file format without any data loss issue.


